Skip to:
Skip to content
Skip to navigation
Home
About
Contact
Log in
Thoroughbred OwnerView – Thoroughbred Owners, Thoroughbred Trainers, Thoroughbred Partnerships, Thoroughbred Retirement
Top Stories:
NTRA Launches Initiative to Promote Safety in Racing
Uncle Mo Back in Customary Position Among Top 10 Sires
Red Oak Stable Owner/Breeder Brunetti Dies at 56
New Vocations' Annual Open Barn and BBQ Event April 25
Anne to Represent Arqana for Middle East, India
Darley Confirms Too Darn Hot Will Return to Australia
ECL Entertainment, Clairvest to Purchase Wyoming Downs
Sierra Leone Makes First Appearance at Churchill Downs
Tickets for Breeders' Cup at Del Mar Now on Sale
T.I.P.-Eligible Horses Enter Defender Three-Day Event
More
Top Stories:
Zedan Appeals Muth’s Derby Denial; Says Harm to Horses Who Might Get Excluded Is ‘A Phantom’
Raging Sea Romps Home In the Baird Doubledogdare
Momentum Of HRWS Continues To Build With Keeneland Event
Regally Bred Quester Graduates First Time Long at Gulfstream
$850k Nyquist Filly Leads Way as OBS Spring Sale Sets Records Again
Emery Begins Her 3-Year-Old Campaign With A Win At Keeneland
Churchill Downs And Fasig-Tipton Partner For Three-Race Series, Includes La Troienne
Florida Derby Champ Fierceness With ‘Super’ Work; West Saratoga Breezes At Keeneland
Champion Whitmore Jumps At Any Chance, Especially At Oaklawn
Highland Falls Should Sit The Right Trip In Oaklawn ‘Cap
More
Site Content
Main menu
Trainers
Syndicates
Ownership
Owners
Stallion Farms
Incentives
Owner Program
Racetracks
Advisors
Auctions
Training
Licensing
Veterinary
Publications
Aftercare
Steeplechase
Consignors
Owner Conference
Race Entries
Results
Programs
Naming
BloodHorse Daily
Today's TDN
Account and Etc
Home
About
Contact
Log in
You are here
Home
Overview
Equine Welfare 101
Health Considerations
Racehorse Injuries
Transition Retired TBs
Reproductive Care
Veterinarians and the Track
Pre-Race Inspection
Find a Vet
Veterinary Clinics
Mobile & Racetrack Practices
Ask the Vet
Research
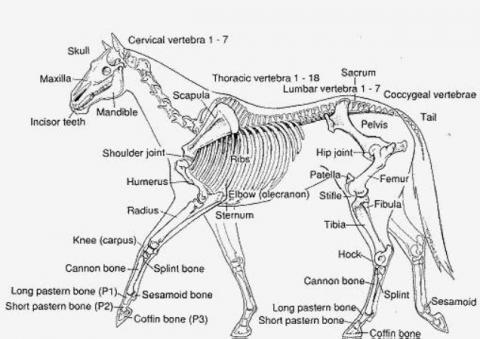
Equine Anatomy Illustrations
Equine Anatomy Illustrations